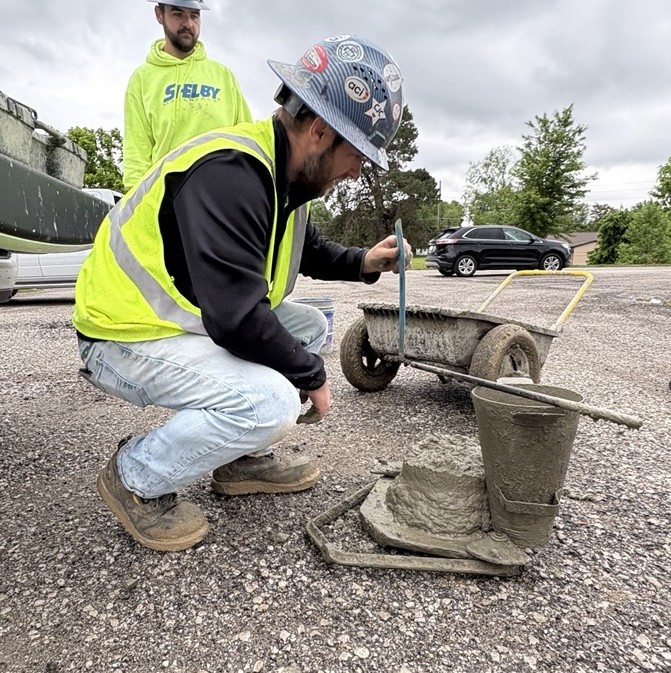
After verifying concrete temperature, the next step in the field testing workflow is conducting a concrete slump test. The slump test provides a quick indicator of the consistency and relative workability of fresh concrete at the time it is sampled.
Slump testing is commonly used to confirm that the delivered concrete is consistent with the expected characteristics of the mix design. Significant variation from the expected slump may indicate changes in water content, batching, or mixing conditions that could affect placement and performance.
It is important to note that slump is not a direct measure of concrete strength or performance. Instead, it serves as a practical field check that helps technicians identify unexpected changes in a concrete mixture.
ASTM Reference
ASTM C143/C143M
Materials Required
- Slump cone
- Concrete sample
- Scoop
- Bullet-nosed metal tamping rod (5/8 in. diameter × 24 in. long)
- Ruler or measuring device
The slump cone is a metal mold with an internal diameter of 4 inches at the top, 8 inches at the bottom, and a height of 12 inches.
Procedure
Begin the slump test within five minutes of obtaining the concrete sample. The entire test—from filling the mold through measuring the slump—should be completed in approximately 2½ minutes.
Place the slump cone on a hard, flat, rigid, non-absorbent surface that is free from vibration. The inside of the cone should be damp before testing begins. Secure the cone by standing on the foot pieces or otherwise stabilizing it so that it remains firmly in place.
Fill the cone with concrete in three equal layers, each representing approximately one-third of the mold’s volume.
First Layer
Using a scoop, place concrete into the cone until it fills the first third of the mold. Distribute the concrete evenly around the cone.
Rod the layer 25 times using the tamping rod. The rod should penetrate through the layer and slightly into the base of the mold.
Second Layer
Add concrete until the mold is approximately two-thirds full. Rod this layer 25 times, penetrating about one inch into the first layer to ensure proper consolidation.
Third Layer
Fill the cone to overflowing. Rod the layer 25 times, again penetrating approximately one inch into the underlying layer.
After rodding the final layer, strike off the surface using a rolling and screeding motion of the tamping rod so the concrete is level with the top of the mold. Remove any excess concrete from around the base of the cone.
Carefully lift the mold vertically in a steady motion, without twisting or lateral movement. The mold should be raised completely in approximately 5 seconds.
Immediately place the empty mold next to the slumped concrete. Position the tamping rod across the top of the inverted mold so it extends horizontally over the displaced concrete.
Measure the distance from the underside of the rod to the highest point of the slumped concrete. Record the slump measurement to the nearest ¼ inch (5 mm).
Forney Fact
A properly performed slump test does not provide a direct measure of concrete performance. However, when combined with knowledge of the project specifications and the historical behavior of the mix design, slump testing becomes a valuable field indicator.
Consistent slump results help technicians verify that the concrete delivered to the site matches expected characteristics. Unexpected changes in slump can signal adjustments in water content, batching variations, or other factors that may affect placement and finishing.
With slump verified and documented, the next step in the field testing workflow is determining wet density.