Wet concrete properties impact how the material sets and strengthens over time, which means technicians need to measure these properties by sampling fresh material at the construction site. In this blog, we provide twelve field testing tips for doing just that.
As a part of a QA/QC workflow, field testing measures important wet concrete properties at the time of mixing and pouring (prior to curing). These tests ensure that the concrete mix has the right consistency and workability, meeting the specs of the project. Tests include:
- Slump (or slump flow for self-consolidating concrete)
- Temperature
- Unit weight (density)
- Air content
Fresh concrete testing takes time, and there are a number of standards to adhere to. Plus, the information collected and the way concrete is handled at this step greatly inform the rest of the QC process – and the project as a whole.
So, having the right equipment and knowledge about these tests is critical.
Ultimately, this means following the standards. However, the regulatory language can be difficult to master, especially for new testers. Over the years, industry professionals have compiled best practices and supplementary manuals – like ACI’s R0030-19 – to help provide more insight into testing fresh concrete.
Here are twelve tips inspired by such manuals and our own real practice – all in accordance with ASTM.
12 Tips for Field Testing Wet Concrete Properties
- Test slump with a steady, vertical motion
- Test slump flow for self-consolidating concrete (SCC)
- Use the slump cone upside down to test filling ability
- SCC should flow like “hot lava”
- Quality SCC should not have a large “halo”
- Reset the test with a J-Ring to test passing ability
- Test temperature within 5 minutes of placing thermometer
- Use your air meter bucket to measure unit weight
- You can substitute air content for density if a correlation exists
- Use the pressure method for air content in normal-weight concrete
- Expel trapped air before compressing the canister
- Capture wet concrete properties with a mobile field app
#1. Test slump with a steady, vertical motion
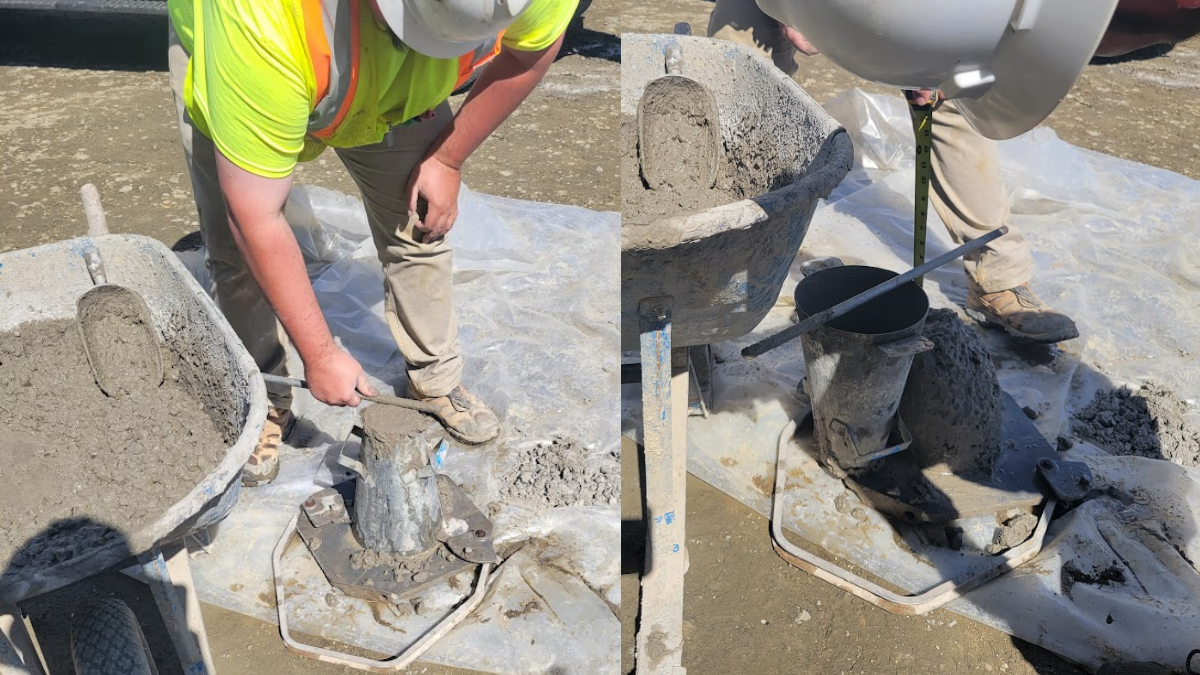
Slump testing (ASTM C143) assesses the consistency and workability of fresh concrete by measuring the degree of deformation that occurs when a sample of freshly mixed concrete is placed and compacted. At the center of these tests is the slump cone.
Fill the cone with concrete, strike-off the top surface, then remove the cone in a steady, vertical motion.
One of the keys to completing this test successfully is to control how quickly you remove the cone – ASTM C143 says it should take five seconds, plus or minus two seconds, to lift the cone twelve inches.
The difference in height between the top of the cone and the settled concrete is then measured and recorded as the slump.
#2. Test slump flow for self-consolidating concrete (SCC)
Traditional concrete doesn’t really spread, it slumps, which is why that test works. SCC, on the other hand, can spread out anywhere between 20 inches and 30 inches. So when you’re working with SCC, you’re going to want to look at slump flow, instead.
Slump flow testing measures a few different things:
- Filling ability (how well it gets into every void of the mold)
- Static segregation (how well the coarse aggregate uniformly disperses)
- Passing ability (how well it goes around imbedded objects like rebar)
#3. Use the slump cone upside down to test filling ability
Filling ability follows ASTM C1611. You’ll need a bigger base (most testers use a large plastic platform), but you can otherwise use the same primary tool… that is, the slump cone, only upside down.
R0030-19 advises that the test is easier with the smaller end of the cone facing down, though ASTM C1611 gives you the option between upright or inverted.
#4. SCC should flow like “hot lava”
Place the slump cone in the center of the base and pour the concrete sample into the cone without rodding or other consolidation.
Vertically lift the cone and let the concrete spread (it should flow “like hot lava, not like water,” as R0030-19 puts it).
Measure the widest and narrowest diameter, then calculate the average between the two.
#5. Quality SCC should not have a large “halo”
At this point, you should also visually inspect the “SCC patty” for static segregation. A visual inspection will help you gauge how well the SCC does what it’s supposed to do (self-consolidate).
This is ranked on a scale of 0 to 3 called the Visual Stability Index (VSI), with 0 as the most stable mix and 3 as the least. A VSI of 0 or 1 is ideal, but 2 may be acceptable. Some mixes have a lot of liquid on the outside and aggregate clumped in the middle, producing what looks like a halo around the edge of the patty. A large halo is your “3.”
#6. Reset the test with a J-Ring to test passing ability
After slump flow, it’s time to reset to test the passing ability of SCC, according to ASTM C1621. You will use the same orientation as you did for the slump flow filling ability test. This time, you need a J-Ring, which is a tool that restricts the flow of SCC so you can measure how well it passes through the obstructions.
The test works the same as before. Results should be about >90% of the slump flow measure.
As mentioned, SCC does not need to be tested for slump (rather, slump flow). No-slump or dry-case concrete also don’t need to be tested for slump.
#7. Test temperature within 5 minutes of placing thermometer
Measuring temperature is fairly straight forward, but important. Temperature also impacts workability, setting time, and long-term durability.
Warm concrete gains strength faster but its strength at later ages is lower than cool concrete. ASTM C1064 requires the temperature test to be completed within 5 minutes after placing the thermometer in the concrete.
#8. Use your air meter bucket to measure unit weight
Density is another straightforward test. All you need is a field scale and a bucket. Here’s a tip: Save a step by using your air meter bucket for this test, so once you’re done measuring unit weight, you can immediately move on to air entrainment.
Regardless of what container you choose, you need to know its volume and weight. Technically, you don’t need to know the weight of your container if you tare the scale while the empty container is on it. Then, you simply add your concrete to the container and weigh it. Based on the weight of the concrete and the dimensions of the bucket, you can calculate the concrete’s density.
This is important because it provides valuable information about the proportion of materials in the mix so you can verify compliance with specifications. If adjustments need to be made to the mix due to unit weight falling outside of the specified limits, the measurement should be taken again after the mix is adjusted.
#9. You can substitute air content for density if a correlation exists
Density is another indicator of workability and flowability, and it is closely related to the consolidation and air content of fresh concrete.
In fact, there’s a commonly accepted exception to a density test with this correlation in mind. When performed in accordance with ASTM C138, density may be substituted for ASTM C231 or ASTM C173 (air content standards; see below) after a correlation between air content and density has been established.
Also, dry-cast concrete density typically does not need to be tested unless otherwise specified.
#10. Use the pressure method for air content in normal-weight concrete
At this point, you have your concrete in your air meter bucket already. Now, you can use this setup for the next test: air entrainment.
There are two options for normal-weight concrete: the pressure method (ASTM C231) or the volumetric method (ASTM C173). The pressure method is more commonly used because the test is easier and faster (and remember, your concrete can already be in the bucket used for this method).
The volumetric method is not as commonly used for normal-weight concrete, but it is preferred (and often required) for lightweight concrete or concrete using porous aggregate. This is because the volumetric method is more accurate than the pressure method in that context.
#11. Expel trapped air before compressing the canister
In accordance with ASTM C231, the pressure method measures the air content as a percentage of the total volume of the concrete.
First, clean the rim of the bucket to get a tight seal.
Then, put the cover assembly on the bucket and seal the cover with clamps. Close the main air valve, open the petcocks, and add water into one petcock until water emerges from the other petcock.
The key here is to make sure you expel any air trapped inside the air meter. Now pump the canister to the specified pressure. Then, release air into the bucket. Based on how much the pressure drops, you can measure how much air was in the concrete as it compresses the “old air” with “new air.”
The air content of an SCC mix can affect the desired mix properties, so it’s important to test air content regularly with your slump flow testing and VSI observations.
#12. Capture wet concrete properties with a mobile field app
At the center of your field concrete testing is the data you’re working hard to collect. How are you securing this data and validating that you have taken the proper steps?
More and more field technicians have turned to mobile field apps for data collection, enhancing efficiency and transparency in the QC process. This type of field app, powered by CMT software, ensures that the data you capture in the field automatically syncs with subsequent work in the lab. As you capture fresh concrete testing data, a unique specimen ID should be generated that automatically associates cylinders with a sample and project.
Conclusion
Proficiency with testing wet concrete properties come down to understanding the best practices of performing these tests. If you learn to do these tests by the book, with the help of some tips and tricks along the way, you will be well equipped for this important step of the QA/QC process.
Forney’s construction materials testing equipment has been trusted by thousands of construction companies and labs for over a hundred years. Shop now or tell us about your testing needs.